
Keeping your site's code inside a git repository like GitLab is a great way to keep track of the changes as they happen. Adding automatic deployments to the mix ensures that when those changes occur, they're automatically pushed to your live site.
In this article, we'll show you how to automatically deploy your WordPress site's files from GitLab CI.
Initial Setup
Always Test in Staging First
Just like any other changes to your site, there's always some potential for things to go wrong. To be safe, be sure to always test your configurations against a staging site before deploying to your production environment.
Setting Up Your GitLab Repository
If you're going to be automatically deploying from GitLab CI, it's important to make sure that your repository's contents properly match the environment you'll be deploying to. Otherwise, changes could be lost when a deployment occurs.
For more information on setting up your repository and excluding files from deployments, see our article on setting up git repositories for automatic deployments.
Note: If you are using a self-hosted GitLab instance, you will need to use a Docker runner.
Creating a New Integration in Atomic
The Integrations feature allows you to easily create credentials that can for integrating 3rd-party services. These integration credentials are what we're going to be using in this article.
Before continuing to the next section of this article, you'll need to have already created an integration within Atomic. For more information, see our article on creating a new integration in Atomic.
Setting Up Your Integration Secret in GitLab CI
For security purposes, we recommend that you never store passwords or other security credentials in plain-text. Since your integration's secret behaves like a password for deploying to your sites, it should be stored inside an environment variable within GitLab CI.
Here's how to store your integration's secret token as a environment variable:
- Start by logging into GitLab CI and access the repository that you want to deploy from.
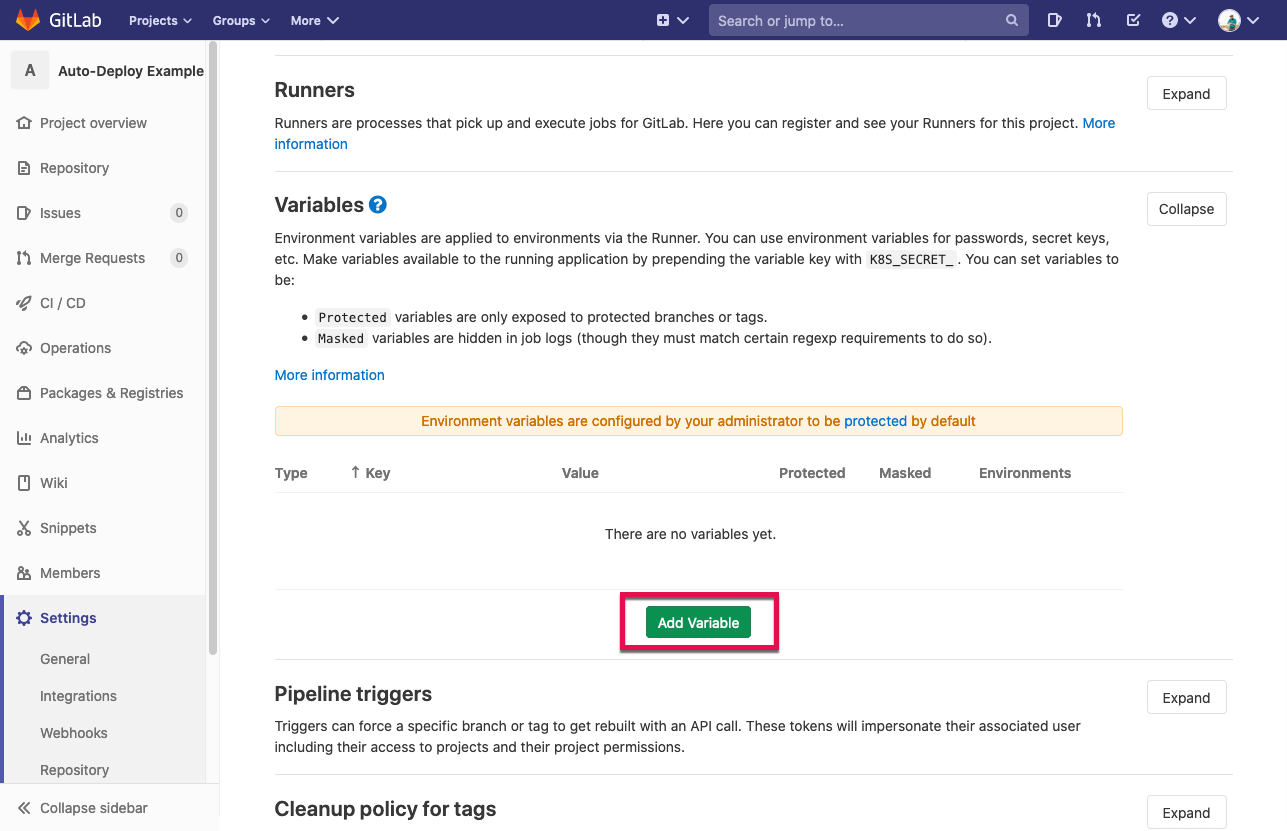
- Inside the left menu, hover over Settings and click on CI/CD.

- Once within the CI/CD Settings page, expand the Variables section, then click on the Add Variable button to add a new variable.
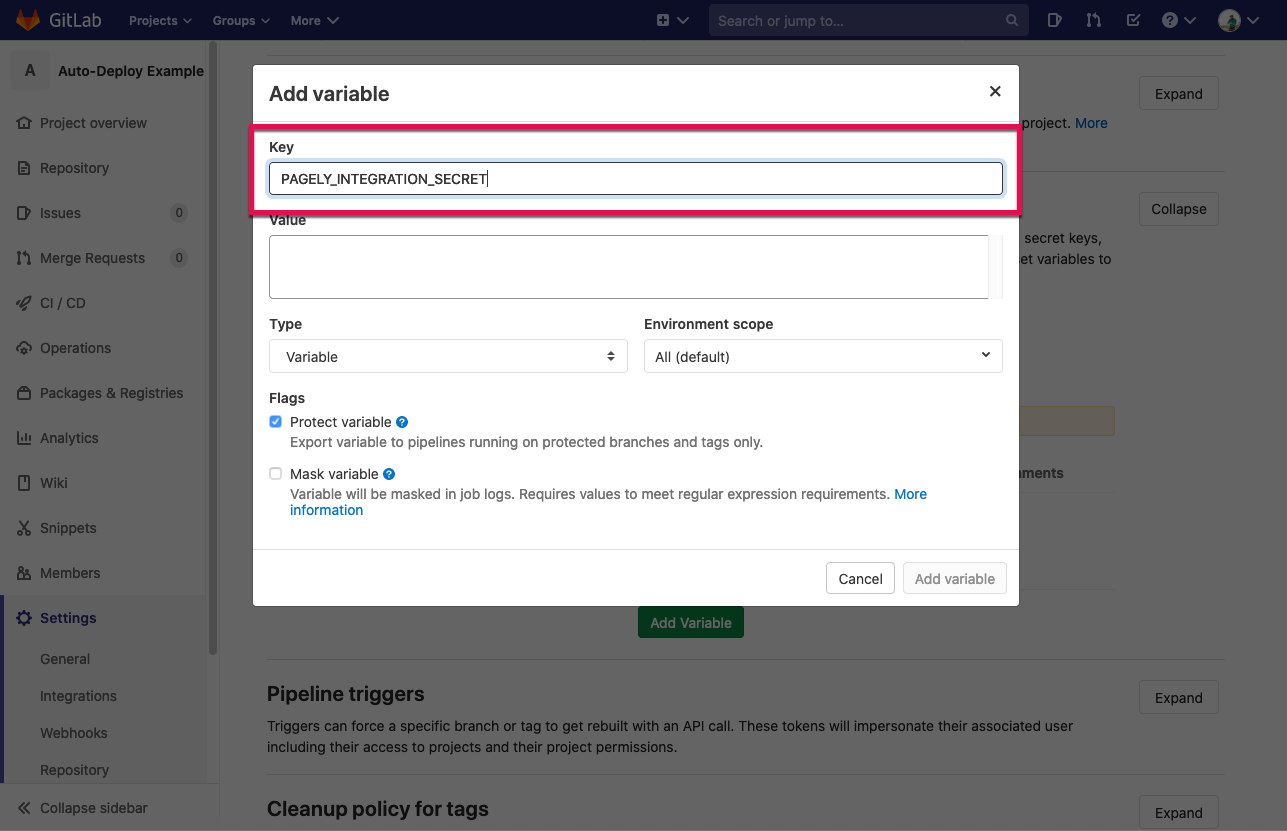
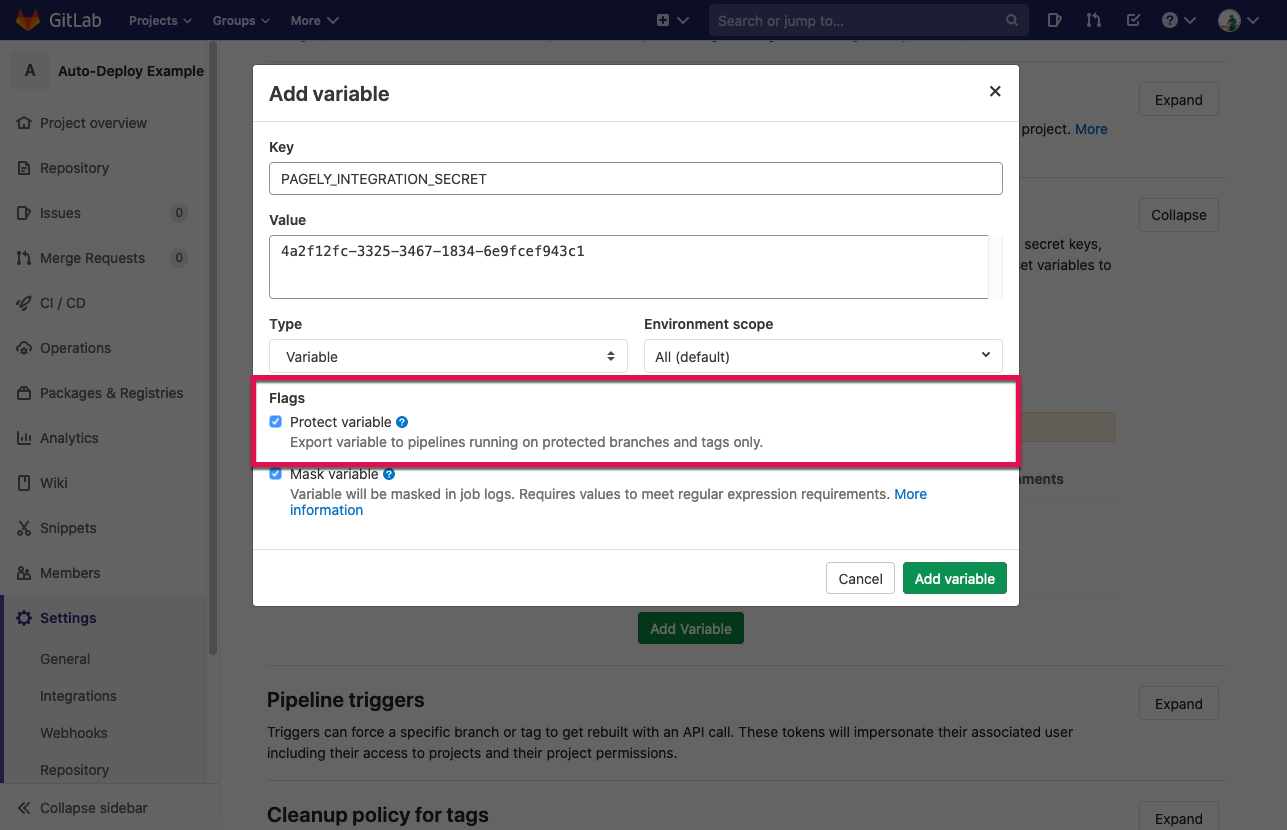
- When adding a new variable, the first field is the Key field. For this example, we'll be adding our integration secret as PAGELY_INTEGRATION_SECRET.
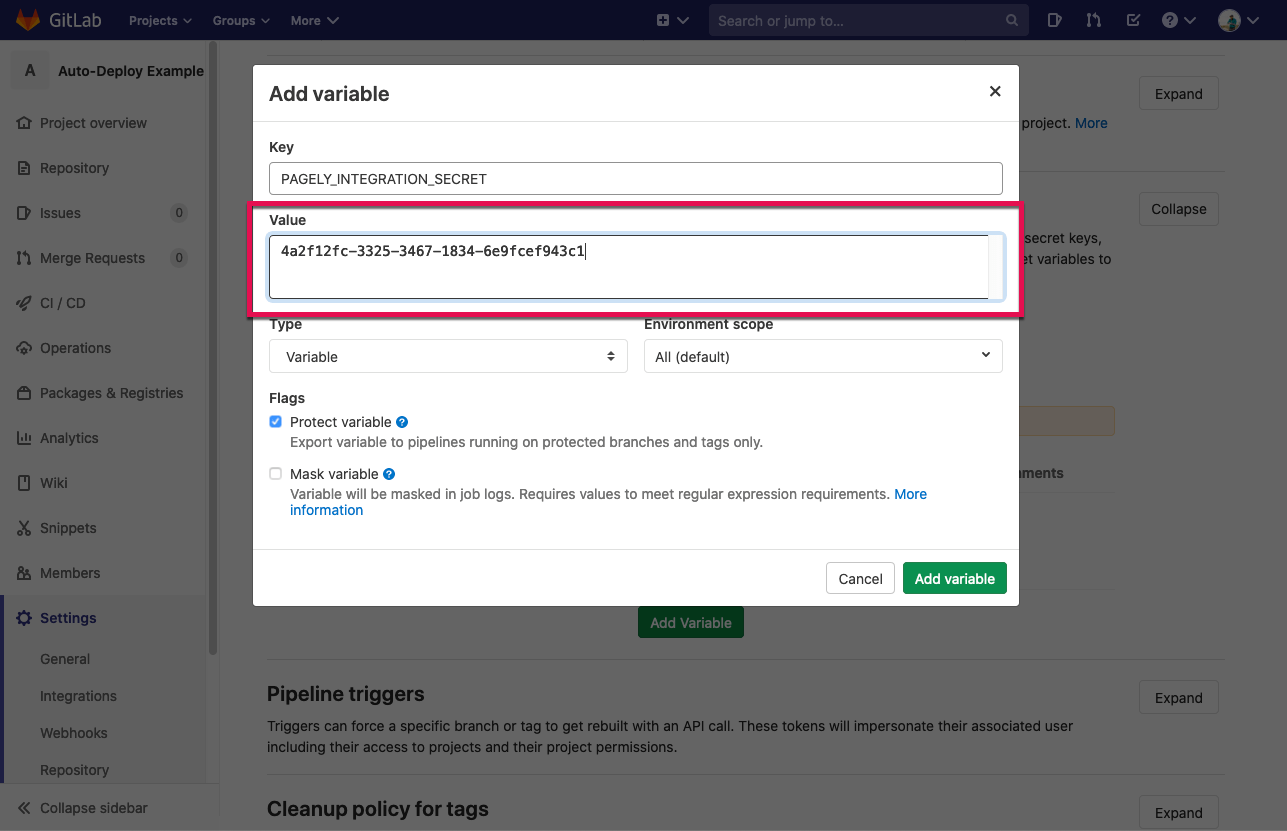
- Inside the Value field, you'll enter the Integration Secret that was generated for you when creating the integration in Atomic.
- For security purposes, this secret should also be masked from displaying inside the logs. To do this, enable the Mask Variable checkbox.
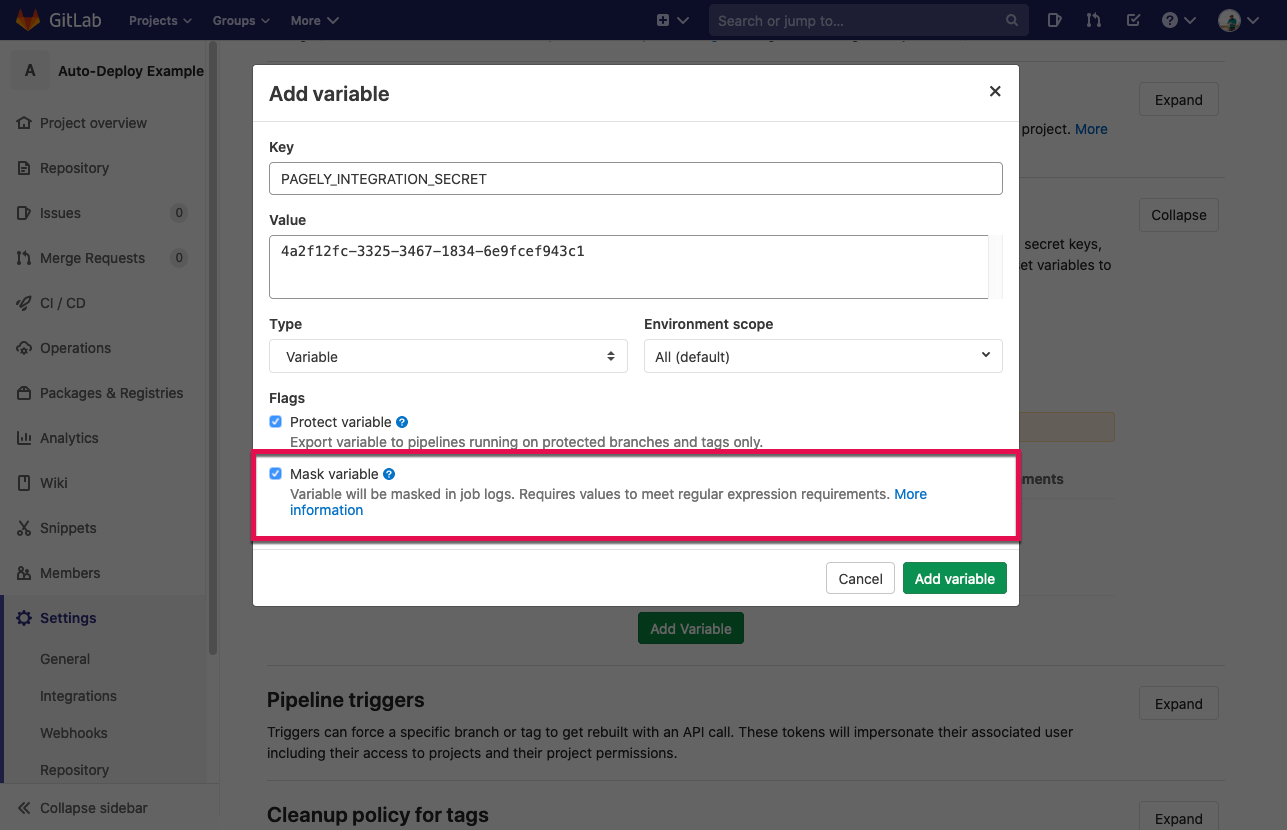
- By default, the Protect Variable checkbox should be enabled. Unless you need to deploy from an unprotected branch or tag, you can keep this option enabled.
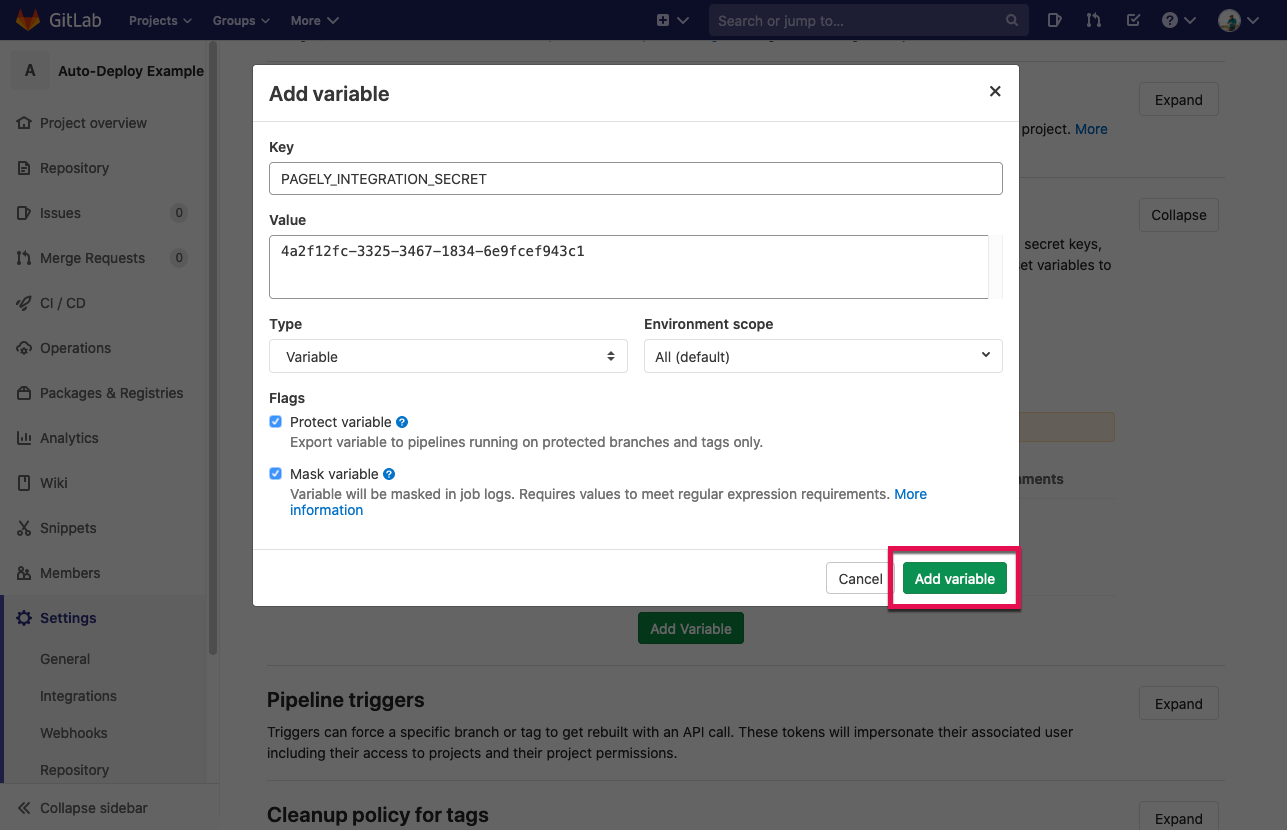
- Once your variable's information is in place, just click on the Add Variable button to add it.
Creating a Deployment Pipeline
To make your automated deployment pipeline as simple as possible, Pagely provides a Docker image for you to use. Since all of the heavy lifting is already handled for you, all you'll need to do is create your pipeline and set a few variables.
Here's what an example of that deployment pipeline looks like when using Pagely's deployment Docker image:
image: pagely/pagely-vps-deploy:1

deploy:
  variables:
    PAGELY_DEPLOY_DEST: "/httpdocs"
    PAGELY_WORKING_DIR: "/builds/$CI_PROJECT_PATH"
    PAGELY_APP_ID: "12345"
    PAGELY_INTEGRATION_ID: "REDACTED"
    PAGELY_INTEGRATION_SECRET: $PAGELY_INTEGRATION_SECRET
  script:
    - echo "Deploying $CI_PROJECT_NAME to Pagely app $PAGELY_APP_ID"
As you can see from the example above, all we're doing is using the pagely-vps-deploy image and setting a few variables to provide additional details. If you're already familiar with using GitLab CI pipelines, you can grab the configuration from the example and drop it into your pipeline's YAML file and edit the variables as needed.
In case you're not already familiar with creating a pipeline in GitLab CI, let's walk through it together:
- Inside the root directory of your repository, create a file named
.gitlab-ci.yml, open it inside your favorite editor, and paste the example from above. - Next, you're going to want to review and adjust a few variables. The first of these is the PAGELY_DEPLOY_DEST variable. This variable controls the directory on your WordPress site that your repository will deploy to.
In our example, we've set this to/httpdocs, which will deploy your files to the root directory of your WordPress site.
If you're deploying a single plugin or theme, you'll want to adjust this to reflect that particular theme or plugin. For example, if you are deploying a theme, the variable would be set to/httpdocs/wp-content/themes/my-example-theme.
For more information this and other variables, see our deployment Docker image reference documentation. - The next variable in the list is the PAGELY_WORKING_DIR variable. Inside this variable, you'll define the directory that GitLab CI will upload to your WordPress environment.
In our example, we've set this to/builds/$CI_PROJECT_PATH. This will upload your repository's root build directory. If you're performing additional build steps and need to deploy a specific directory, you can modify this variable to suit your needs. Otherwise, you can leave it we've defined it in the example. - So that the Docker container knows what server and app to deploy your repository to, the PAGELY_INTEGRATION_ID and PAGELY_APP_ID need to be defined. Both of these variables can be located within the Atomic control panel on the Integrations and Apps pages, respectively.
- For demonstration purposes, our example sets PAGELY_INTEGRATION_SECRET as a variable with the same name. This is because the variable is already being set within the GitLab CI repository settings. Since it will behave the same way, you're free to remove this line from your file or leave it as-is.
Once your .gitlab-ci.yml file is configured, triple-check it over again to make sure you didn't make any typos, then push it to GitLab. Now that your deployment pipeline is in place, any changes that are committed to your repository will be automatically deployed to your WordPress site.
As always, if you have any questions that we weren't able to cover in this article, feel free to contact our support team at any time.