
If you need a GUI interface for database management, you can use SSH tunneling to connect to the database.
Requirement: SSH Access
To use an SSH tunnel, you'll first need to have SSH access. Before continuing, be sure that you have already configured SSH access. If not, take a look at one of the following articles for more information:
Getting Your WordPress Database Credentials
To configure your MySQL client, you'll need to get your database settings such as host, username, and password. Here's how to get it:
- Locate the wp-config-hosting.php file for the site that you want to manage the database on. This can be done using SFTP or by running the following command over SSH:
cat ~/sites/example.com/wp-config-hosting.php - Inside the wp-config-hosting.php file, you'll see your database settings as DB_NAME, DB_USER, DB_PASSWORD, and DB_HOST. Be sure to make note of these values as you'll need them later when configuring your MySQL client.
You now have your MySQL database credentials for your WordPress site. You're now ready to continue on with configuring your MySQL client.
Configuring Your MySQL Client
- Open up your remote SQL client.
Note: In this example, we will be using Sequel Pro. You can use any MySQL client, as long as it has the ability to utilize an SSH tunnel. The settings will be the same across most clients, although the UI reflected in the screenshots will vary between MySQL clients. - For your Connection Method, be sure that SSH is selected.
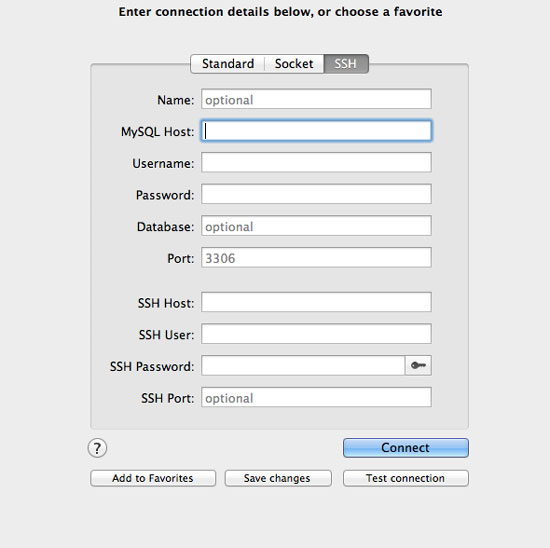
- Next, fill in the MySQL Host, Username, Password, and Database settings with the settings that you obtained in the previous section of this article.
- Within the SSH Host and SSH User fields, enter in your SSH credentials that you would normally use when connecting over SSH.
- To set your SSH password, click on the key icon to the right of the SSH Password field and locate your SSH private key.
Note: If your SSH key is stored as ~/.ssh/id_rsa, you can usually leave this blank without any action, but depending on your client, you may need to manually select it. - Finally, test the connection by clicking on the Test Connection button.
- If the connection was successful, save your connection for easier access by clicking on the Save changes button.
Once you're finished setting up your client, all you have to do now is connect to the MySQL server!